This document is for IT administrators using the Google Admin Console and the HP Print for Chrome app.
HP Printers - Using Google Admin and HP Print for Chrome
Introduction
HP Print for Chrome works with the Google Admin console to allow administrators to manage how and where their users can print. It also controls which printing features are available.
HP Print for Chrome requires management of a group through the Google Admin console. Managed printing features work for users only on Chrome OS. The features do not work on Windows, Mac, or Linux computers, or mobile devices.
Use case: HP Print for Chrome in schools
A school district buys 3,000 Chromebooks and 200 HP printers for 100 classrooms. Every student gets a Chromebook, and every classroom gets 2 printers, one for the teacher and another for students to share. Every Chromebook is on the school’s network, controlled through the Google Admin console. HP Print for Chrome extends the Google Admin console to include the printers, giving the administrator control of features and helping them manage printing costs. For example:
-
The IT administrator can allow color printing for teachers while limiting students to black-and-white. Teachers can be allowed to print single-sided, while student printing is mandatory two-sided (duplex) to save on paper.
-
The administrator can manage printer discovery, allowing teachers to see every printer on the network, including the high-capacity printer in the main office – while showing students only the classroom printer.
-
HP Print for Chrome lets the administrator set global rules for all printers, then make exceptions for individual printers by using the Configuration File Generation tool or by manually changing settings in the Configuration File.
Google Admin console
The Google Admin console lets IT administrators manage users and printers. To access the console, go to Google Admin. You must be an administrator to access the features necessary to manage HP Print for Chrome printing.
Manage groups, organizations, users, devices, and apps
Groups, organizations, users, devices, and apps are managed in the same way you would normally manage each of them.
For help with these activities, log into the Google Admin console, then search the help/documentation for groups, organizations, manage users, chrome devices, or manage chrome apps.
Before managing HP Print for Chrome, it is best to set up a few users and organizations. These can be changed or moved later.
note:To get the full benefits of managed printing, the administrator should disable native Chrome OS printing in the Google Admin console. Disabling the native Chrome OS printing prevents users from using printers outside of HP Print for Chrome.
Set policies
HP Print for Chrome lets administrators set the following policies. For best performance, all policies should be included in a policy file. If the policy file is omitted, performance can be unpredictable due to Chrome OS policy behavior.
Administrators can set policies for these features:
-
Color printing: For color printers, this feature allows HP Print for Chrome jobs to be printed in color. If color printing is turned off, all jobs are printed in black-and-white. Use the Configuration File Generation tool or open the Configuration File and manually set "AllowColorPrinting":true.This policy can be overridden for individual printers by setting an Individual Printer Policy.
-
Mandatory two-sided (duplex) printing: For printers that offer two-sided (duplex) printing, this feature requires that all jobs be printed on both sides of the paper. If mandatory two-sided printing is turned off, users can configure two-sided printing settings for their jobs, but it is not required. Use the Configuration File Generation tool or open the Configuration File and manually set "ForceDuplex":true.This policy can be overridden for individual printers by setting an Individual Printer Policy.
-
Adding printers by IP address: This feature allows users to add printers by entering the printer’s IP address. When turned off, adding printers by IP address is not available to the users. Use the Configuration File Generation tool or open the Configuration File and manually set "AllowAddPrinterByIP":true.
-
Printer discovery: This feature allows HP Print for Chrome to discover printers on the network and display them to network users. If printer discovery is turned off, users can see and print to only printers that were added via policy, manually through the UI or connected via USB cable. Use the Configuration File Generation tool or open the Configuration File and manually set "AllowPrinterDiscovery":true.
-
USB printing: This feature allows users to connect and print with a USB cable. If USB printing is turned off, printing through USB is not allowed. Use the Configuration File Generation tool or open the Configuration File and manually set "AllowUSBPrinting":true.
-
App instructions: By default, HP Print for Chrome displays an instruction screen the first time you turn on or restart your computer. The screen provides printing instructions and other information. You can configure the app to display the instructions only when you click the app icon. Use the Configuration File Generation tool or open the Configuration File and manually set "ShowInstructions":false.
-
Data collection: This feature allows HP Print for Chrome to share anonymous and aggregated usage data with HP to further improve HP Print for Chrome performance and experience. If data collection is turned off, no data is sent to HP. Use the Configuration File Generation tool or open the Configuration File and manually set "AllowDataCollection":true.If you use this feature to collect data on behalf of an organization, you agree that the organization is responsible for compliance with all applicable data privacy laws and is legally authorized to enable such data collection. HP automatically collects and analyzes Anonymous and Aggregated Data from the app installed on your organization’s devices. This is used for the purposes of Product Support & Improvement, Business Operations, Research and Innovation. You can read more about the data collection in the sections titled What Data We Collect and How We Use Data in the HP Privacy Statement. HP uses Google Analytics to collect this data. Learn more about Google Analytics at Google Privacy & Terms.
-
Manually add printers: Printers can be added individually by policy using a customized printer name and the IP address for the printer through the Printers policy. If printer discovery and USB printing are disabled, this is the only way to allow users to print. To add printers manually, type the printer names and IP addresses in the Configuration File Generation tool or add them in the Configuration File as described in the Create policy Configuration Files section.
-
Individual printer policies: Printers can have individual policies that override the “global” policies for color printing and two-sided printing. (Individual printer policies are not supported by the Configuration File Generation tool.)
-
Color printing can be turned on for an individual printer by opening the Configuration File and manually setting "AllowColorPrinting":true.
-
Mandatory two-sided (duplex) printing can be turned on for an individual printer by opening the Configuration File and manually setting "ForceDuplex":true.
-
-
Accept license agreement: When you enable this feature, you agree that you have reviewed and accepted the End User License Agreement on behalf of your organization, and individual users do not see the End User License Agreement. Use the Configuration File Generation tool or open the Configuration File and manually set "AcceptEULA":true.
Create policy Configuration Files
Policy Configuration Files can be created manually or through the HP Print for Chrome Configuration File Generation tool. The Configuration File is a JSON-formatted text file. Each organization within the Google Admin console can have a unique Configuration File with its own set of policies.
Create Configuration Files with the Configuration Generation Tool
Access the Configuration File Generation tool in HP Print for Chrome to create Configuration Files.
-
Click the app icon, then click For admins at the top of the window or For administrators only at the bottom.
-
For admins
-
For administrators only

-
-
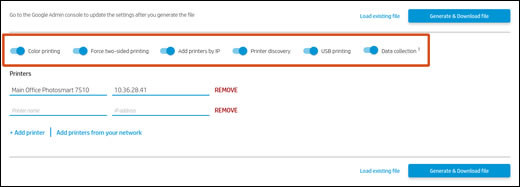
Click Generate file to launch the tool.

-
Click the on or off toggles to enable or disable different policies as described in the previous section.
-
Under Printers, you can add an individual printer by typing the printer's name and IP address in the appropriate field.
-
Choose a method for adding additional printers:
-
+ Add printer: Create new lines to add additional individual printers.

-
Add printers from your network: Automatically discover and add printers that are on the network. Click the checkbox next the printer name from the printer list, then click Update printers.

-
-
After you add printers, rename any printer on the list to make it easier to discover. For example, an 'HP ENVY 8000' can be renamed 'Main Office HP ENVY 8000.'
Save and name Configuration Files
When all policies and printers are set as desired, click the Generate and download file button to save the file. Type a file name or leave the default name: 'configuration_file.json.' Click the Save button to download the file to your Downloads folder.
Once a Configuration File has been created, it can be used as a starting point for another file. Click the Load existing files button in the Configuration File Generation tool. Select a previously created Configuration File to pre-set all of the printers and settings, edit as needed, then save as a new file.
note:Individual printer policies for color printing and two-sided printing are not currently supported in this tool. If they are included in the loaded file, they are not included when the file is saved.
Manually create or edit a Configuration File
The policy Configuration File is a JSON formatted text file. The following text are examples of the contents of files with all global policies set to true and two printers added - one with no individual policies and one with color printing blocked and single-sided printing allowed.
{
"AllowColorPrinting": {
"Value": true
},
"ForceDuplex": {
"Value": true
},
"AllowAddPrinterByIP": {
"Value": true
},
"AllowPrinterDiscovery": {
"Value": true
},
"AllowUSBPrinting": {
"Value": true
},
"ShowInstructions": {
"Value": true
},
"AllowDataCollection": {
"Value": true
},
"AcceptEULA": {
"Value": true
},
"Printers": {
"Value": [
{
"IP":11.11.11.11",
"name": HP Photosmart 7510",
},
{,
"IP":11.11.11.12",
"name": HP Deskjet 3630 series",
"AllowColorPrinting": false,
"ForceDuplex": false
}
]
}
}
Add policies to the Google Admin console
Once a Configuration File has been created, it must be uploaded and applied to the user or group of users through the Google Admin console.
-
Access the Google Admin console when signed in as an admin at Google Admin.
-
Select Device management > Chrome management > App management > HP Print for Chrome> User settings.A list of organizations displays.
-
Select the organization to apply the Configuration File.
-
Click UPLOAD CONFIGURATION FILE.

-
In the file browser, select the correct Configuration File for that organization, then click Open.
-
After the file has been validated by the Google Admin console, click SAVE.The policies in the Configuration File are applied to the selected organization.
If the organization has previously had a Configuration File uploaded, a View link and a large X displays under the Configure section.
-
Click the X to remove the existing Configuration File.
-
Click UPLOAD CONFIGURATION FILE to select a new one.
-
After the file has been validated by the Google Admin console, click SAVE.The policies in the Configuration File are applied to the selected organization.
Turn off native Chrome OS printing
Disable native Chrome OS printing to prevent users from using printers outside of HP Print for Chrome.
-
Access the Google Admin console when signed in as an admin at Google Admin.
-
Select Device management, Chrome management, and then User settings.A list of organizations displays.
-
Select an organization, then search for Native printers management in the search setting bar.
-
Click Do not allow users to add new printers, then click SAVE.

-
To confirm native Chrome OS printing is disabled, type chrome://settings/cupsPrinters in address bar, press Enter, then make sure the Add Printer button is disabled.
Troubleshooting
All the settings uploaded to the google console should be deployed automatically to the Chromebooks as policies. HP Print for Chrome uses these policies to modify the behavior. To confirm that all the policies have been deployed, open the Chrome browser, type chrome://policy in address bar, then press Enter.
Enter a topic to search our knowledge library
What can we help you with?

Need Help?