HP PCs - Using Windows Security to prevent virus and spyware problems (Windows 10)
Windows Security helps protect your computer against pop-ups, slow performance, and security threats caused by viruses and spyware. Malware can infect your computer without your knowledge. It might install itself from an email message, when you connect to the internet, or when you install certain applications using a USB flash drive or other removable media. This document explains how to scan for and remove malicious software using Windows Security.
Windows Security helps to prevent malware from infecting your computer in two ways:
-
Real-time protection: Windows Security notifies you when it detects possible malware affecting your computer. It also notifies you when important settings are changed by an application.
-
Scanning options: Windows Security scans for malware that might be installed on your computer. You can remove (or temporarily quarantine) threats detected during a scan.
Note:
Windows Security steps and screens vary depending on your version of Windows 10.
Enabling Windows Security
To enable Windows Security, open the app, and then turn it on.
Note:
On some HP computers, Windows Security is already installed, enabled, and running automatically.
-
In Windows, search for and open Windows Security.
Note:If you get an error message that Windows Security is not protecting your computer and you are not able to open Windows Security, see Unable to activate Windows Security in this document.
-
Check the message in the Virus & threat protection area.
-
If the shield icon displays a green circle with a checkmark
and the message No actions needed is displayed, Windows Security is enabled.
-
If the shield icon displays a red circle with an x
and the message Actions needed is displayed, click the shield icon, and then click Turn on.
-
Unable to enable Windows Security
If you are unable to enable Windows Security and an error message displays that Windows Security is currently not protecting your computer, the computer might have a different antivirus application installed. To resolve this issue, remove the old antivirus software before enabling Windows Security.
If you need help uninstalling your previous antivirus software, go to HP PCs - Uninstalling Software (Windows 10, 8) for more information.
After uninstalling the antivirus application, restart your computer, and then use the steps provided in Enabling Windows Security to enable Windows Security.
Opening Windows Security
In Windows, search for and open Windows Security or click Start, and then click Windows Security in the apps list.
Checking the performance and health of your device with Windows Security
Make sure your device is up to date, has storage space, and has an up-to-date driver using Windows Security.
In Windows, search for and open Windows Security, and then click Device performance & health.
The Health report displays.
Scanning for and removing viruses and spyware from the PC
Use Windows Security to scan for and remove any viruses, spyware, or other malware from the computer.
-
Quick scan: A quick scan checks the places on the hard disk drive that malware is most likely to infect.
-
Full scan: A full scan checks all files on your hard disk drive and all currently running applications. If you suspect that malware has infected your computer, run a full scan. The scan might take over an hour to complete, and the computer might run slowly during the scan.
-
Custom scan: A custom scan checks specific computer drives and files that you select.
-
Windows Defender Offline scan: A Windows Defender Offline scan checks for rootkits or highly persistent malware on your computer. Select this option to check for malware outside of the normal Windows system. The scan might take 15 minutes to complete, and the computer restarts as part of the scan.
Note:HP recommends using the Windows Defender Offline scan if you suspect your computer is infected with malware or a virus.
-
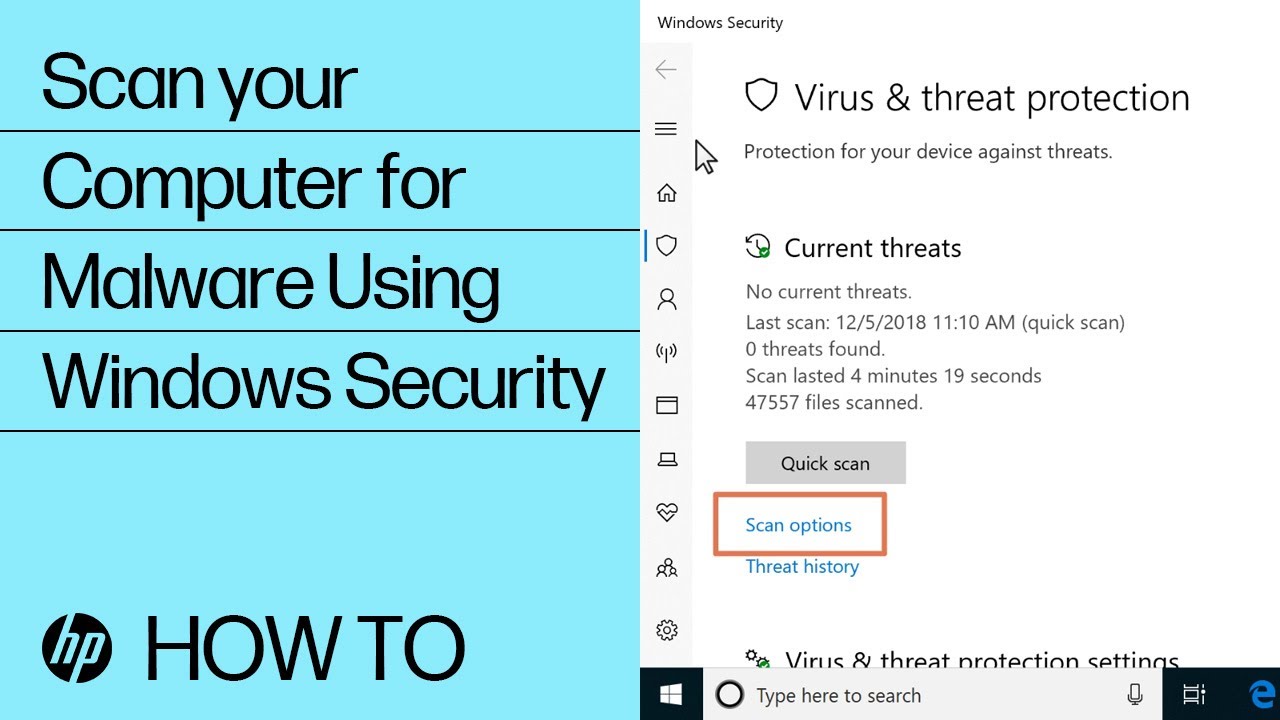
In Windows, search for and open Windows Security, and then select Virus & threat protection
.
-
Click Quick scan, Scan options, or Run an advanced scan, and then select the type of scan you want to run.
-
If you choose Quick scan, the scan begins.
-
If you choose Scan options, continue with these steps to run a full system scan, a custom scan, or a Windows Defender Offline scan.
-
-
Select one of the following options, click Scan now, and then click Scan .
-
If you choose Full scan, the scan begins.
-
If you chooseCustom scan, select the specific drives or folders to scan, and then click Select Folder.
-
If you choose Windows Defender Offline scan, save any open files, and then click Scan. If a User Account Control window opens, click Yes.
Note:The computer restarts when an offline scan completes.
-
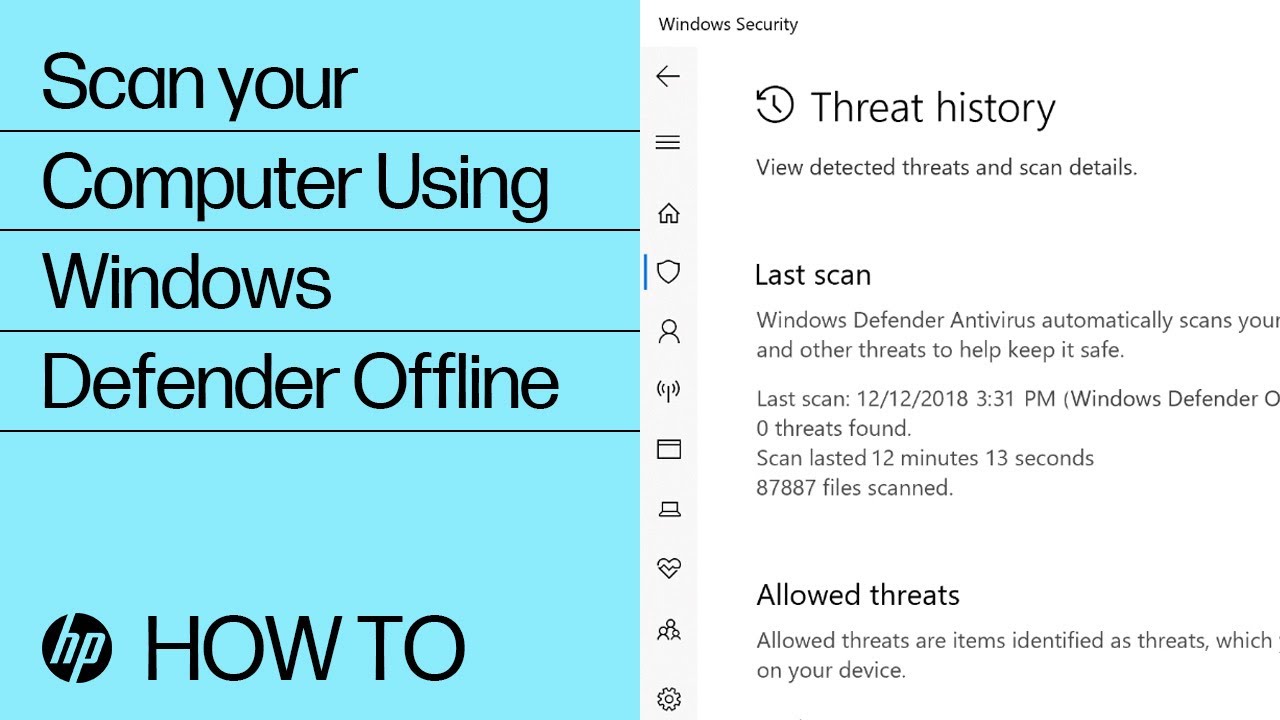
Viewing Windows Security Scan results
After Windows Security runs a Quick, Full, or Custom scan, the scan results display on the scan window. However, after a Windows Defender Offline scan runs, you need to open the scan results to view them.
-
In Windows, search for and open Windows Security, and then click Virus & threat protection
-
Click Threat history.
A list of current, quarantined, and allowed threats displays.
Note:
To see a list of all threats Windows Security has ever identified for the device, click See full history.
Selecting items to be excluded from a Windows Security scan
To increase the speed of a scan, you can exclude specific files, locations, file types, and processes from the scan.
CAUTION:
Excluding items from a scan might leave your computer vulnerable to the latest malware.

-
In Windows, search for and open Windows Security, and then click Virus & threat protection
-
In the Exclusions area, click Add or remove exclusions.
-
Click the plus sign (+) next to Add an exclusion, and then select File, Folder, File type, or Process from the drop-down menu.
-
If you want to remove an item from the exclusions list, select the item you want to remove, and then click Remove.
Protecting your folders from malicious applications with Windows Security
Use the Controlled folder access feature to protect your files and folders from malicious apps, such as ransomware.
-
In Windows, search for and open Windows Security, and then click Virus & threat protection
-
In the Controlled folder access area, click Manage Controlled folder access.
If the User Account Control window displays, click Yes.
-
In the Controlled folder access area, click the toggle button.
-
Click one of the following options, depending on how you want to protect your files and folders.
-
Click Protected folders to choose the specific folders you want to protect. Many folders that come pre-loaded on Windows 10 are automatically protected.
-
Click Allow an app through Controlled folder access to choose the applications that can access your files and folders.
-
Resolving threats with Windows Security
If Windows Security detects potentially unwanted or harmful software, the best option for resolving the threat automatically displays in the scan window or the scan history. Choose from the options that display, such as Clean threats or Start actions, to resolve the threat.
Note:
You can also remove malware using the Windows Uninstall option. Search for the software you suspect as malware, right-click the software name in the list of results, and then click Uninstall.
Obtaining Windows Security updates
If you do not have a broadband connection that is always on or you want to check for updates, you can manually check for and install security updates for Windows Security.
Virus, spyware, and other malware definitions are files that Windows Security uses to identify threats to your computer. Microsoft regularly provides critical updates to make Windows more secure. These updates are important for protecting a computer. To keep these definitions up to date, Windows Security works with Windows Update to automatically install new definitions as they are released. If you have a broadband connection that is always on, set the Windows Update tool to automatically check for updates daily.
-
Click Check for updates.
After the search completes, the updates automatically install.
Enter a topic to search our knowledge library
What can we help you with?

Need Help?